Fun DIY Sensory Toys for Kids with Autism
Many kids with Autism Spectrum Disorder (ASD) often face sensory challenges. Fortunately, there are plenty of enjoyable toys made to excite and help improve a child’s senses while they play safely and naturally. These toys can include things like vivid colors, various sounds, and even different feels. So instead of action figures and dolls, here are some easy-to-make, DIY sensory toys for autism that you can create with your child at home!
Easy Homemade Sensory Toys for Autism
Learn how to make sensory toys for your child with some of the easiest options that will fill your home with lots of laughter.
Sensory Tunnel
The remarkable thing about this versatile sensory tunnel is that it offers a multitude of possibilities for various activities. You’ll discover it can be your go-to tool for many exciting adventures! One fantastic way to use it is by encouraging your kids to crawl through the tunnel while they push an exercise ball ahead of them. It’s not just fun; it’s also a fantastic heavy-work activity that can help them build strength and coordination.
You can also think of it as your stretchy resistance band. Stand right in the middle of the sensory tunnel, grasp each end firmly with your hands, and then start stretching! This activity can provide a soothing and resistance-filled sensory experience. Finally, transform the tunnel into a sensory swing. Enlist the help of your spouse or partner. Each of you holds one end of the tunnel, lifts it, and gently sways it back and forth. It’s a delightful way to enjoy sensory input and relaxation.
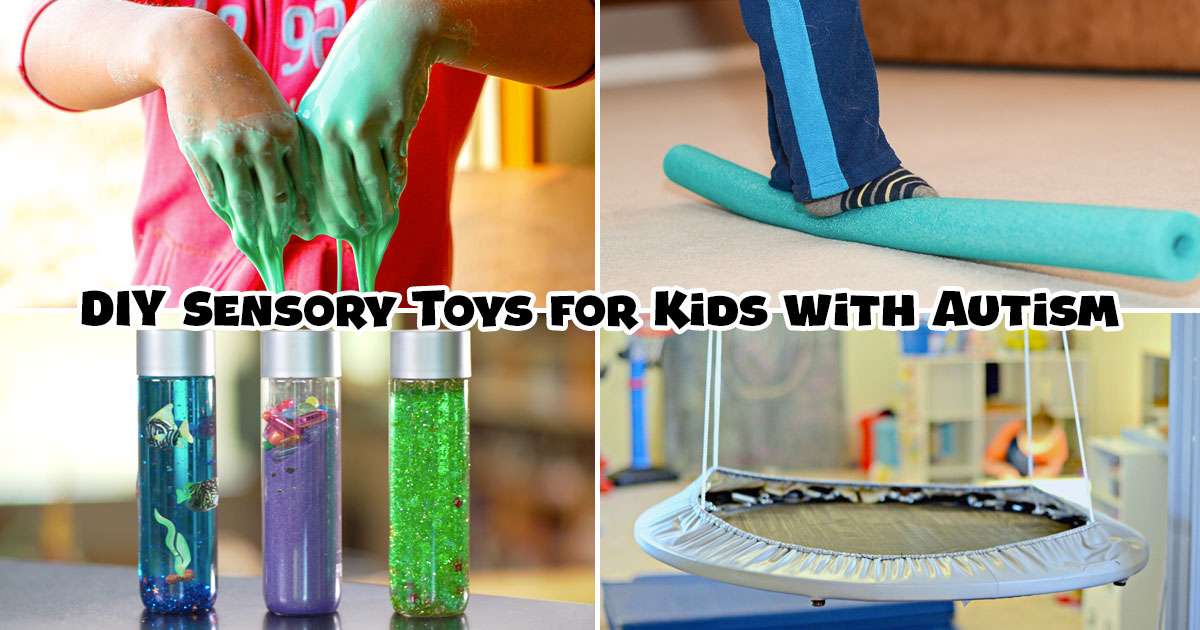
Oobleck
One of the best homemade sensory toys for autism is Oobleck, and creating it is a breeze. You can whip up this fascinating substance with just three simple ingredients: cornstarch, food coloring, and water. Oobleck is truly a marvel; it defies the conventional definitions of liquids and solids, existing as a non-Newtonian fluid. When untouched, it behaves like a liquid, but the moment you apply pressure, it transforms into a solid-like substance. Here’s your step-by-step guide to making Oobleck:
Step 1: Begin by mixing your choice of food coloring with a cup of water. This step adds a vibrant and captivating visual element to your Oobleck.
Step 2: In a separate container, combine two cups of cornstarch with the colored water mixture. Stir them together until you achieve a captivating, gooey consistency.
Tip: If your Oobleck doesn’t solidify convincingly when pressed, you can adjust its texture by adding a bit more cornstarch to the mixture. This simple tweak allows you to fine-tune the sensory experience you desire.
Pool Noodle Balance Beam
Creating a DIY balance beam for children with a humble pool noodle requires absolutely no advance preparation, and it’s a budget-friendly option. Yet, it delivers a wealth of vestibular sensory stimulation for kids. This ingenious idea is not only a fantastic way to combat boredom on rainy days, but it’s also a godsend for those living in compact spaces. In fact, you can maximize your pool noodle by using it for both this balance beam and our DIY pool noodle balance board.
The best part? Setting up this DIY balance beam is a piece of cake! Just grab a pool noodle from your local dollar store and lay it flat on the floor. Then, issue a challenge to the kids: Can they successfully navigate the noodle’s length with their balance and coordination skills? It’s a simple and engaging activity that promises hours of fun and sensory exploration.
Sensory Bottles
Creating sensory bottles is a simple and mess-free activity that offers a delightful visual experience while aiding children in finding calmness. These captivating bottles typically contain a mixture of water, clear glue, and assorted fun materials. Young ones adore shaking them and witnessing the mesmerizing dance of glitter and other objects within the bottle. You’ll need clear bottles, warm water, clear glue, glitter, food coloring, and assorted items.
- Step 1: Begin by filling the bottle halfway with warm water.
- Step 2: Next, pour in clear glue to fill the remaining space in the bottle, making sure to leave some room for the small objects you’ll be adding later.
- Step 3: To infuse some color and flair, add a drop of food coloring to the mix.
- Step 4: Now, the magic happens. Toss in glitter and any other small items you’ve chosen for your bottle’s interior. Then, give it all a good shake! Watch as the contents swirl and twinkle, creating a captivating sensory spectacle.
- Step 5: To ensure that your sensory bottle remains mess-free and secure, firmly glue the lid shut.
DIY Platform Swing
Creating your very own DIY platform swing is easy, and you’ll be surprised at how quickly you can put it together—less than ten minutes. It’s a remarkably straightforward project. What’s even better, if you’ve already got swing hooks in place, you won’t need any tools at all, except for a pair of trusty scissors. Let’s dive into why this project is such a piece of cake:
- Sturdy Foundation: The secret behind the simplicity of this DIY platform swing is the mini trampoline. It comes with a built-in padded cushion around its frame, making it comfortable and safe for your swinging adventures.
- Robust Structure: You’ll be pleased to know that the mini trampoline boasts a sturdy frame capable of supporting a substantial amount of weight. It’s designed with durability in mind, ensuring a secure and enjoyable swinging experience.
- Easy Leg Removal: The icing on the cake is that the legs of the mini trampoline can be effortlessly detached. This feature makes it an ideal choice for your DIY platform swing, as it streamlines the setup process and allows for easy customization.
DIY Slime
Creating your own homemade slime is not only a popular sensory activity but also a fantastic way to engage kids in a hands-on project. They’ll enjoy the tactile experience of squeezing, rolling, and pulling the slime while reaping the benefits of improved fine motor skills. You’ll only need ¾ cup of clear glue, food coloring, ½ teaspoon of baking soda, 1 ½ tablespoons of contact lens solution, glitter, and an assortment of small objects.
Step-by-Step Guide:
- Step 1: Begin by mixing ¾ cup of clear glue with the food coloring of your choice. This step adds a captivating visual dimension to your slime.
- Step 2: Incorporate ½ teaspoon of baking soda into the mixture. This ingredient helps give the slime its desired consistency.
- Step 3: Add in 1 ½ tablespoons of contact lens solution, specifically the type containing boric acid. This is a crucial step in forming the slime’s texture.
- Step 4: If you want to add a touch of sparkle and fascination, toss in some glitter (this step is entirely optional). Stir until the mixture no longer sticks to the bowl and the glitter is evenly distributed.
- Step 5: Now comes the fun part! Knead the slime with your hands and dive into a world of sensory play. Squeeze, stretch, and mold it to your heart’s content.
Make the Best Homemade Sensory Toys for Your Autistic Child
These easy-to-make sensory toys and games are great for kids with autism because they let them explore a world of sensory wonder. There are so many great choices, like balance beams, fascinating sensory bottles, DIY platform swings, and fun homemade slime. Sensory tunnels and Oobleck are just a few examples. These projects are great for developing sensory skills, small motor skills, imagination, and having a lot of fun. These hands-on tasks can make times fun and learning, whether you’re a parent, a caregiver, or a teacher!