Beat Creation 101: Beat Making Equipment for Beginner Producers
Beat-making has been making waves for decades, tracing its roots back to the urban ghettos and poor communities that gave birth to hip-hop. From the early days when drum machines were the primary tools used for creating beats to the modern era where software and technology have taken center stage, the art of beat-making has evolved yet stayed true to its core.
According to a study by Nielsen Music, 26% of the music consumed in the U.S. is hip-hop, a genre where beat-making plays a significant role. This popularity has led to the proliferation of beat-making videos since 2005, with YouTube becoming a platform for budding artists to showcase their skills.
Despite the evolution and technological enhancements, the essence of beat-making music remains the same. It’s about producing that bouncy, catchy beat that gets people moving. But what exactly does it take to create a beat? What equipment do you need to start creating your own rhythms?
Essential and Budget-Friendly Beat Making Equipment
Here’s a list of the most important and budget-friendly beat-making equipment, listed in order of priority:
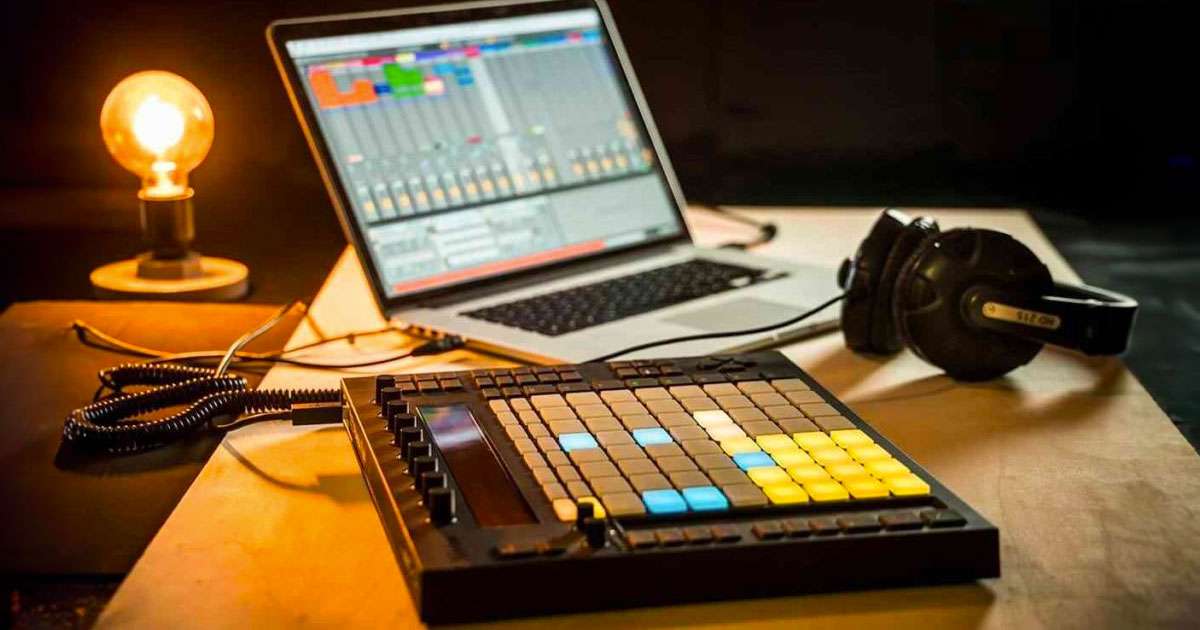
1. Digital Audio Workstation (DAW)
our DAW is essentially your music production playground. It’s the software platform that hosts all your virtual instruments, sound libraries, recording tools, and mixing plugins. Beginners can start with FL Studio Fruity Edition ($99) or Reason Essentials ($69), both offering comprehensive features at an affordable price. The key to mastering your DAW lies in understanding its workflow – learning how to create and arrange tracks, use built-in synthesizers and samplers, apply effects, mix elements, and export your final track. There are numerous online tutorials and courses available to help you navigate these platforms.
2. MIDI Controller
This device acts as the physical interface with your DAW, allowing you to play virtual instruments and tweak sound parameters in real-time. For beginners, the Akai Professional MPK Mini MKII ($119) or Novation Launchkey Mini ($109) offer a good balance between functionality and affordability. These controllers feature keys for playing melodies, pads for triggering samples or beats, and knobs for adjusting effects parameters. To use them, you simply connect the controller to your computer via USB, configure it in your DAW, and start playing.
3. Sound Libraries and VSTs
Sound libraries and Virtual Studio Technology (VST) plugins expand your sonic palette with a wide range of instruments and effects. A good starting point is the free Komplete Start bundle from Native Instruments, which includes 15 instruments, effects, and over 1,600 sounds. You can load these sounds and instruments into your DAW and manipulate them using your MIDI controller or by programming patterns directly onto your DAW’s timeline.
4. Studio Monitors and Headphones
For a reliable playback system, consider investing in studio monitors like the PreSonus Eris E3.5-3.5″ ($99) and studio-grade headphones such as the Audio-Technica ATH-M20x ($49). These devices provide a flat, uncolored representation of your sound, allowing you to make accurate mixing decisions. Understanding how to position your monitors for optimal stereo imaging and learning to reference your mixes on different playback systems are key skills to develop.
5. Audio Interface
If you plan to record vocals or live instruments, an audio interface like the Focusrite Scarlett Solo (3rd Gen) USB Audio Interface ($119) is essential. It converts analog audio signals into digital format for your DAW and vice versa for playback. To utilize it, connect the interface to your computer, plug your instrument or microphone into the interface, and select it as your input/output device in your DAW’s audio settings.
6. Condenser Microphone
For capturing vocals or acoustic instruments, a condenser microphone such as the Audio-Technica AT2020 ($99) delivers high-quality results. Connect the microphone to your audio interface, set up a new track in your DAW for recording, adjust the input gain on your interface to ensure a clean signal, and you’re ready to record.
7. External Hard Drive
As your music production library grows with more projects, sound libraries, and samples, you’ll need a reliable storage solution. An external hard drive, like the Western Digital WD Elements Portable Hard Drive (1TB for around $45), can offer ample space to store all your work. It also provides the added benefit of portability and makes it easier to back up your projects. Simply connect it to your computer via USB, and you can start transferring files for safekeeping.
8. Home Studio Setup
A quiet, comfortable space dedicated to music production can greatly enhance your productivity. Sound-absorbing foam panels ($20–$50) can improve the acoustics of your room by reducing unwanted reverb and reflections. Place these strategically around your workspace, particularly at reflection points, which are typically where the sound from your monitor bounces off walls and other surfaces.
Beyond Equipment: The Importance of Skills in Music Production
Getting the right tools is an important part of setting up your home studio, but it’s important to remember that these are just the beginning of your music production path. The real fun begins when you start to learn how to use these tools, play around with sounds, and find your own unique musical style.
To make songs, you need to know how to use technology and be artistic at the same time. To make your creative thoughts come to life, it’s not enough to just have the best gear; you need to know how to use it well. To do this, you need to learn how to use all of your DAW’s features, get good at mixing and mastering, improve your ability to make catchy tunes and beats, and get better at listening critically.
Also, every piece of equipment you buy has its own way of being learned. For example, if you want to get the most out of your MIDI controller, you need to know how to map it to your DAW, use it to handle different settings, and even use it for live performance and improvisation.
In the same way, you need to know a lot about signal flow and gain shaping to get the most out of your audio interface. To get good at using a condenser microphone, you need to learn how to place it, how the room sounds, and how to capture a great performance.
Luckily, the internet is full of useful information for people who want to become music artists. Online groups, boards, and guides can help you a lot with these complicated things by giving you useful information, tips, and advice. Don’t be afraid to try new things, ask questions, and make mistakes. You can learn from them. Remember that every great producer has to start somewhere and that each step you take brings you closer to making your musical dreams come true.